
Look, winter is coming, and frankly, my wife keeps dropping hints about new nail looks, which, let’s be honest, is a whole world I’m still navigating.
But even I can appreciate a crisp, clean aesthetic, right? You want a manicure that looks sharp, not slushy.
This list of White Winter Nails is built for folks who appreciate something subtle yet striking – designs that bring that genuinely frosty and fresh vibe without getting overly complicated.
If you’re looking for cool, understated White Winter Nail Art, this is your playbook.
1. “Glacier Ice” Textured Matte
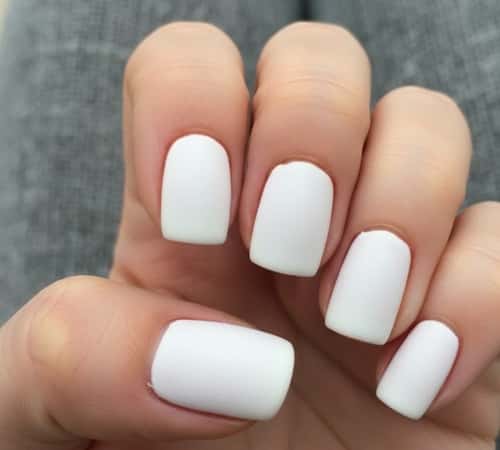
This first one is straightforward, and frankly, it looks expensive without the hassle; we’re talking about a finish that feels tactile and refined.
You start with a pure, bright white polish – you want one that’s genuinely opaque in two coats, no streaks allowed
After your color is completely dry, here’s the kicker: use a specialized matte top coat, which instantly changes the whole dynamic.
I’ve seen this on my sister-in-law, and it really takes the bright, sometimes aggressive look of pure white and mellows it out into something resembling compacted snow.
The matte texture is key because it catches the light differently, mimicking the fine granular surface of a frozen lake or a fresh powder bank.
Here’s How To Make It: Apply two coats of crisp white polish. Once fully dry, apply one layer of a high-quality matte top coat. Ensure the coats are thin to avoid a thick, plasticky finish. The secret here is letting each layer completely cure.
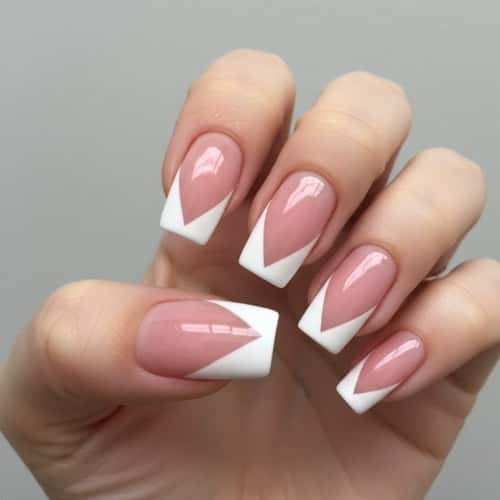
2. “Snow Drift” Negative Space Arc
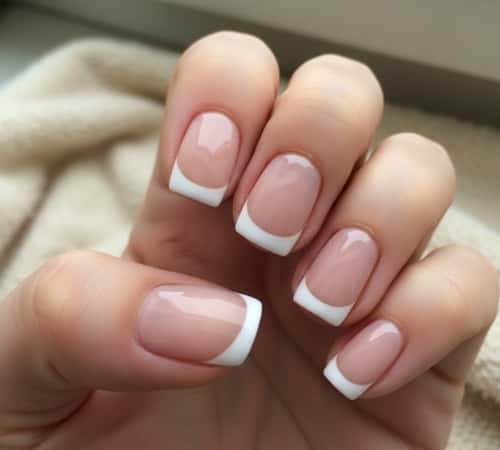
My buddy mentioned this technique once, and it’s pretty clever because it’s a design that uses the absence of color – your natural nail – as part of the final look. It’s smart minimalism.
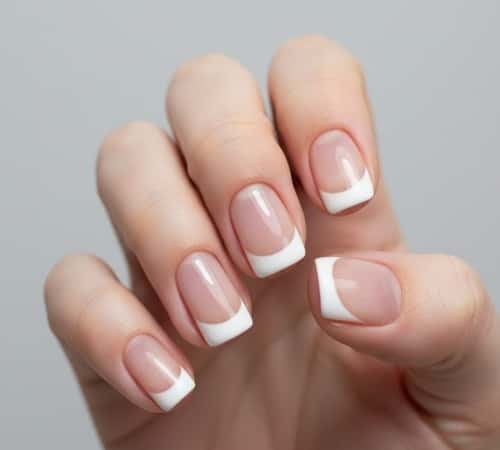
Think of it as painting just the white tips, but instead of the usual straight-line French manicure, you’re creating a subtle, clean crescent shape that starts further down the nail bed.
This technique is often called negative space, and it’s the ultimate way to keep a look fresh – it prevents the heavy, solid feeling you sometimes get with full coverage.
It’s a low-effort, high-impact approach to White Winter Nail Art that feels modern and incredibly clean against your skin tone.
Here’s How To Make it: Start with a clear base coat for protection. Using a thin striping brush or a pre-cut sticker guide, paint a wide, soft arc of opaque white across the top two-thirds of your nail, leaving a small, clean crescent of your natural nail exposed near the cuticle. Finish with a high-shine top coat to seal the edge.
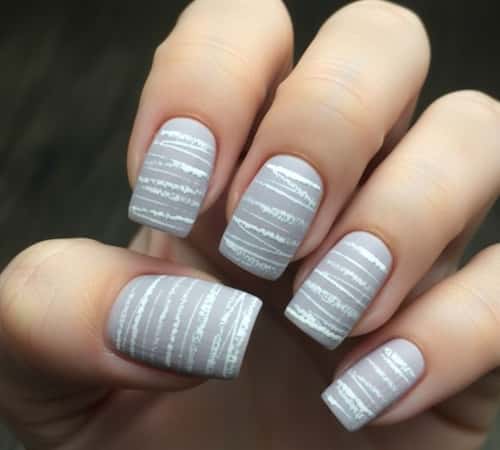
3. “Frosted Window” Sugar Effect
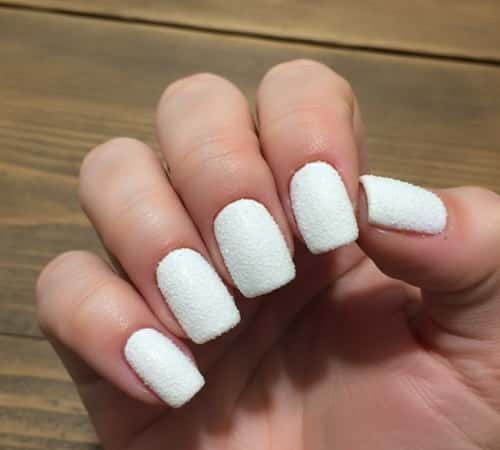
You want to talk texture? This is where you bring out the big guns. It’s called the ‘sugar effect,’ and it delivers on the frosty and fresh promise like nothing else I’ve seen.
Honestly, it looks like you dipped your fingers in a pile of super-fine white sand or, better yet, actual crystalline frost.
The trick is using fine white acrylic powder or a specialty “sugar” glitter that you sprinkle onto a wet, tacky layer of white polish before curing or drying.
It gives a non-smooth, almost gritty, light-refracting finish that just screams White Winter Nails. I appreciate the way it grabs the light, making it look genuinely cold and appealing.
Here’ How To Make it: After applying your base white color coat, apply a second coat but do not cure/dry it yet. Immediately sprinkle a very fine, bright white acrylic powder (or specialty sugar powder) over the entire nail until it’s completely covered. Gently tap off the excess and then cure/dry the nail. Do not apply a top coat over this, as that would ruin the texture.
4. “Arctic Whisper” Shimmer Gradient
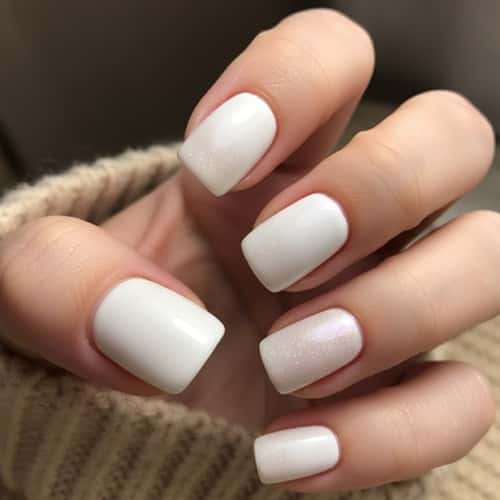
This idea is about subtlety; we’re not going for a disco ball look here, but a soft, almost ethereal transition. Think of a faint, almost invisible white mist settling over a landscape.
For this White Winter Nail Art, you start with a pure white base, and then you fade a translucent, iridescent, pearl-white shimmer polish from the cuticle up about two-thirds of the way.
It’s important to use a cosmetic sponge for this blending to get that genuine, seamless gradient effect.
The shimmer shouldn’t be glittery, it should be an iridescent powder that shifts faintly pink or blue in certain light – that’s the ‘whisper’ part that makes it feel cold and unique.
Here’s How To Make it: Apply one or two coats of a solid, clean white base color. Once dry, dab a small amount of an iridescent, sheer white polish onto a cosmetic sponge. Lightly and repeatedly tap the sponge from the cuticle area up, moving less toward the free edge, to create a soft, faded gradient of shimmer. Seal with a standard glossy top coat.
5. “Hoarfrost Tip” Micro-Dotting
Sometimes the smallest details make the biggest difference, and that’s the principle here. Instead of painting a large design, we’re taking inspiration from tiny, perfectly formed frost crystals clinging to a branch.
This isn’t your average French tip; we’re using micro-dotting to create a delicate, almost pointillist line right along the very edge of the nail.
You need a dedicated dotting tool, the smallest one you can find.
The pattern shouldn’t look like a solid line of white, but rather a sequence of incredibly tiny, distinct white dots, almost like a beaded fringe.
This detailed approach is what elevates it from a basic manicure to sophisticated White Winter Nails.
Here’s How You Can Make it: Apply a clear or very pale pink nude base coat. Use your smallest dotting tool and an opaque white polish. Carefully apply a series of tiny, distinct dots right along the free edge (the very tip) of your nail. Focus on keeping the dots uniform in size and spacing, forming a delicate, lace-like line. Protect with a thin, glossy top coat.
6. “Marble Glacier” Fine Veining
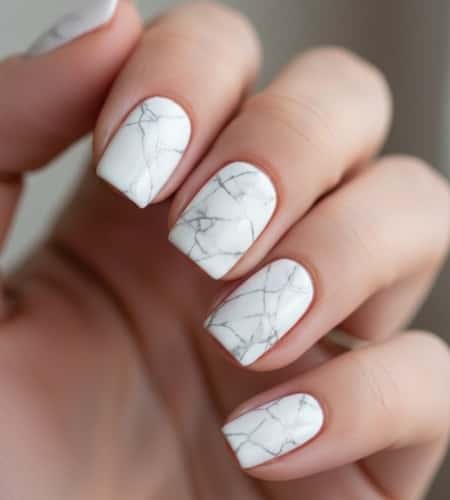
I’ve always thought that natural stone, particularly white marble, has an unmatched elegance – it’s structured and unpredictable all at once.
For this White Winter Nail Art concept, you’re not going for a heavy, abstract swirl, but rather a fine veining that mimics the subtle, cool blue-grey threads often found in expensive Carrara or Bianco stone.
It’s deceptively simple to do, but it requires a very thin brush and a light hand.
The key is to keep the white base completely opaque and then use a highly thinned, light grey or silver polish to trace just a few wispy, intersecting lines, creating that beautiful mineralogical texture.
How To Make It?: Apply two coats of crisp white polish. While the top coat is still slightly tacky (or on a thin layer of clear top coat), use a very fine detail brush dipped in a highly diluted light grey or pale silver polish. Draw 2-3 thin, non-uniform, intersecting lines across the nail, allowing the polish to spread slightly for a soft, authentic marble look. Seal it with a glossy top coat.
7. “Cashmere Cloud” Blurred Edges

You know how some heavy fog or a really soft knit sweater just seems to absorb all the sharp edges around it? That’s the mood we’re capturing here,; it’s one of the most comforting White Winter Nails looks you can try.
This isn’t about a crisp French tip. Instead, we’re using a cosmetic sponge to dab and gently blur the white polish at the tip over a nude base, ensuring there are absolutely no harsh lines.
This diffused boundary makes the white feel less like a sharp paint job and more like a soft, descending mist, providing a beautifully muted and sophisticated result. It’s a genuine step up from standard solid tips.
Here’s How You can make it: Start with a sheer nude or pale pink base coat. Apply a small amount of opaque white polish onto a makeup sponge. Gently and repeatedly tap the sponge just onto the free edge of your nail, blending it inward towards the center until the white is soft, hazy, and diffused into the base, avoiding a defined border. Finish with a matte or satin top coat to enhance the cloud-like effect.
8. “Powder Track” Asymmetrical Stripe
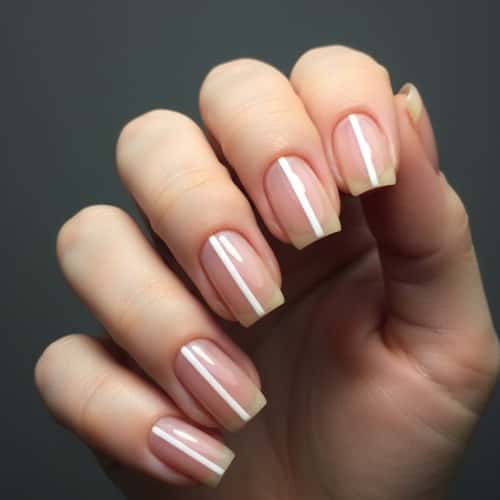
Sometimes, simple geometric shapes are the strongest statement you can make, and frankly, a single, sharp line cuts through the clutter.
This look is all about one deliberate, bold, but narrow stripe of bright white cutting across a clear nail base – not down the middle, mind you, but off to one side.
We’re talking asymmetry here, which adds a lot more visual weight and modern appeal than a centered design.
Using a crisp white against the natural transparency gives this White Winter Nail Art a strong, contemporary architectural feel, making it feel very fresh and intentional.
Here’s How You can make it: Apply a clear base coat. Using a thin striping brush or nail tape, paint a single, precise, and opaque line of white polish vertically down the nail plate, positioning it deliberately off-center – perhaps two-thirds of the way to the side. Ensure the line is perfectly straight and razor-sharp. Protect the linear geometry with a high-gloss top coat.
9. “Pearl Sheen” Iridescent Overlay
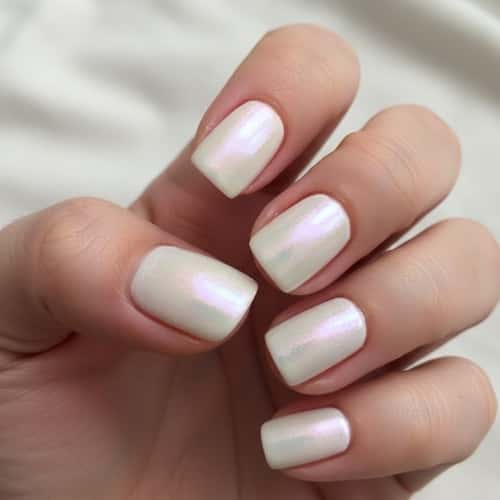
You know how saltwater pearls have that deep, milky lustre that seems to shift colors as you move them? That subtle, internal glow is what we’re aiming for with this unique take on White Winter Nails.
It’s not about chunky glitter; it’s about an iridescent overlay that takes a slightly off-white, creamy base and elevates it to something elegant and luminous.
You want a sheer polish with fine particles that flash almost a pink-gold or a faint blue, making the overall white appear deeper and warmer.
It is a sophisticated use of spectral light effects that avoids looking overtly flashy.
Here’s How You can make it: Apply a coat of warm, slightly off-white (or ivory) polish to the entire nail. Once dry, apply a very thin layer of an iridescent, sheer polish that has a subtle, pearl-like shift. The key is to use a polish that allows the base white to show through, adding just a layer of shimmering depth and luminosity. Finish with a standard top coat.
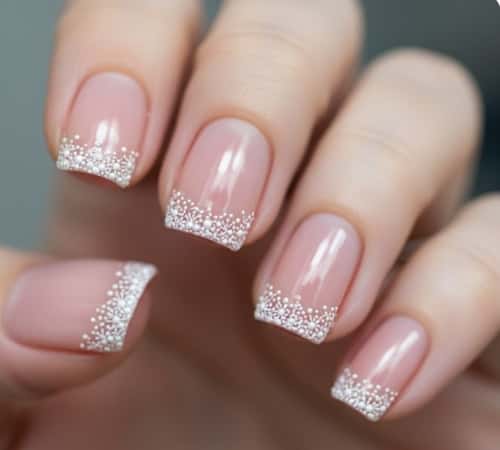
10. “Blizzard Dust” Fine Glitter Cuticle Band
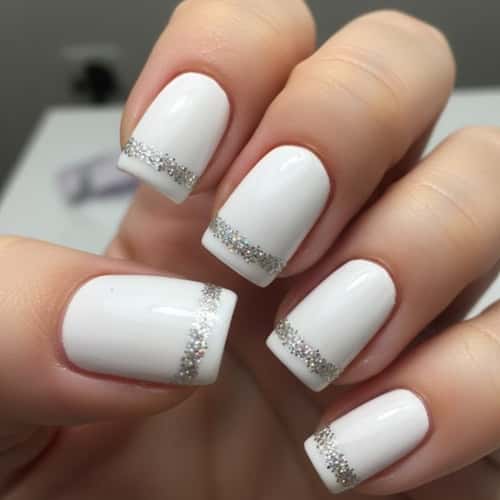
For folks who think glitter is too much, this design offers a clever compromise.
We are focusing all the sparkle onto a tiny, highly concentrated band right at the base of the nail, near the cuticle – it’s like a dusting of snow settled perfectly at the edge of the nail bed.
Use an extremely fine-milled, bright silver or iridescent white glitter, not the chunky stuff.
By restricting the application to a small, circumscribed area, you get that intense, crystalline refraction without the commitment of a full glitter nail. It’s a striking, contained dose of frosty and fresh intensity.
Here’s How You can make it: Apply a solid, clean white polish base. Using a thin detail brush or a toothpick, apply a clear top coat only to a thin, precise line right along the cuticle line (the lunula area). Immediately sprinkle very fine silver or iridescent white glitter onto that wet line. Gently press, dust off the excess, and then seal the entire nail with a top coat, making sure not to drag the glitter down the nail.
11. “Erosion Line” Half-Moon White
You see how concrete or brick sometimes wears away at the edges, leaving that raw, exposed look? That’s the inspiration – a design that flips the traditional French manicure on its head.
Instead of the tip, we’re applying a crisp, perfect half-moon of white at the very base of the nail, right over the lunula.
It’s a throwback, retro-inspired piece of White Winter Nail Art that offers a clean, graphic look.
Leaving the rest of the nail clear or a very sheer nude provides that stark, architectural contrast, which makes the bright white pop beautifully.
Here’s How You can make it: Start with a clear base coat. Using a stencil or a very steady hand, apply an opaque white polish to create a sharp, rounded arc that perfectly covers the lunula (the pale crescent) at the base of the nail. The rest of the nail should be left natural or covered with a sheer, nude shade. Seal with a glossy top coat. The precision of the negative arc is everything here.
12. “Snowflake Tapestry” Simple Decal
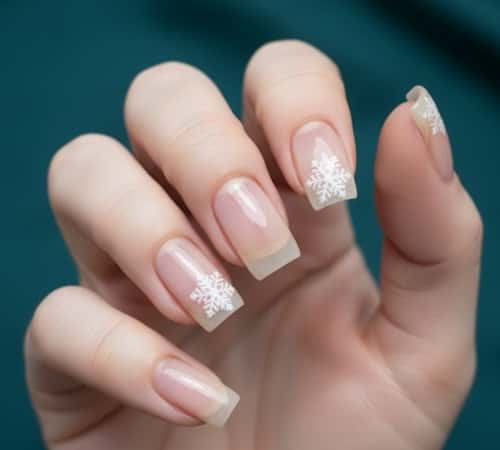
Look, sometimes you just need a straightforward answer, and a quality decal is exactly that.
We’re not talking about painting complicated, detailed designs that require microscopic tools; we’re using a single, high-definition, small white snowflake decal placed strategically near the tip or side of a clear nail.
This type of White Winter Nails leverages the ease of application while still delivering a highly visual, festive result.
The key here is restraint; just one decal per nail, centered for maximum impact, to avoid a cluttered look. It’s a clean nod to the season without the freehand difficulty.
Here’s How You can make it: Apply a clear base coat. Apply a single, small, highly detailed white snowflake decal (ensure it’s water-slide or a thin sticker) onto the desired position on the nail, usually off-center or near the tip. Smooth out any bubbles and ensure the edges are flat. Carefully apply a thick top coat to fully encase and protect the decal and prevent the edges from lifting, creating a smooth encapsulated finish.
13. “Polar Cap” Dipped Tip
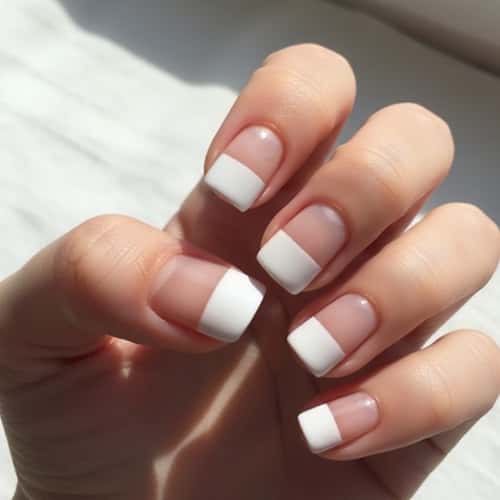
This technique is a fresh, modern twist on the classic tip design. Instead of an arc or a straight line, you want the white polish to come down slightly further on the nail, creating an inverted “U” shape that is totally opaque and blocky.
This is a very deliberate, color-blocking approach. The focus is on the solidity and the almost-architectural boundary where the white meets the clear base.
By keeping the white section blocky and solid, it gives the appearance of a polar cap or heavy, compacted ice covering the top part of the nail. It’s a confident, no-nonsense look.
Here’s How You can make it: Apply a clear base coat. Using a steady hand or nail tape, paint a solid, opaque white polish over the top third to half of the nail. The line dividing the white from the clear/nude base should be perfectly straight, creating a bold, geometric, block-color section. Seal the look with a high-shine top coat to emphasize the solid pigmentation and clean lines.
14. “Drifting Snow” Horizontal Brush Strokes
This look is about movement and texture, deliberately moving away from the need for perfect smoothness.
Instead of a uniform coating, we’re using a dry brush technique to mimic the subtle, almost visible texture of wind-blown snow drifting across a surface.
You need to use very little polish on the brush – almost dry – and apply short, quick, horizontal strokes across a pale grey or sheer base.
The resulting White Winter Nail Art is intentionally uneven and streaky, offering an abstract, layered texture that genuinely reflects the kinetics of snow. This approach truly embraces the messy, beautiful reality of a blizzard.
You can make it: Apply a sheer pale grey or light blue base coat. Wipe almost all the white polish off your brush until it is nearly dry (the dry-brush technique). Using quick, short, uneven horizontal strokes, drag the brush across the nail to deposit fine, textured lines of white polish. Do not cover the base fully. Seal with a thin, non-thickening top coat to preserve the textured kinetics.
15. “Ice Shard” Sharp V-Tip
I figure if you want something that screams “sharp and frosty,” you can’t do much better than a V-tip.
This is a dramatic and angular take on the white tip that makes the nail look longer and much more pointed, even if the actual shape isn’t a stiletto.
It resembles the sharp, jagged edge of an ice shard or a small iceberg – it’s clean, highly defined, and aggressive.
This is an advanced technique in White Winter Nails because the two converging lines that form the “V” must be perfectly symmetrical and meet at a razor-sharp point in the center of the nail.
Here’s How You can make it: Apply a clear or nude base coat. Using thin nail tape or a detail brush, paint two straight, sharp lines of opaque white polish from the outer edges of the nail, converging precisely into a point near the center. Carefully fill in the area above these two lines with the white polish. Remove the tape (if used) before fully drying. This geometric precision is key to the sharp V-shape.
Final Thoughts
Look, when you’re thinking about a shade as simple as white, the real game-changer isn’t the color itself – it’s the texture and the technique you use to apply it.
The difference between a bland, flat color and a truly memorable look, whether it’s the granular feel of the ‘sugar effect’ or the seamless blend of a gradient, is all in the execution.
Understanding how a matte topcoat interacts with light or how negative space can actually enhance a design is the critical piece of knowledge here.
You’re not just painting; you’re applying principles of surface science and art to create depth, making your White Winter Nails feel multidimensional and truly unique.